
Concept art is always struggle...
I found this week’s challenge really difficult – translating the concept into nail art, not the execution. April Showers Watermarble – I just couldn’t get my head around it.
I remembered that I had some droplets vinyls from What’s Up Nails. For Valentine’s Day I used vinyls in a watermarble so decided I could repeat the trick.

Macro of watermarble droplets
As you can see from the finished design, I also just got a new macro lens! It’s given me some new ways to play with my photography of designs.
April Showers Watermarble
My plan for this design was to create a spring background of grass, flowers and blue sky. I wanted to use the vinyls to add marbled droplets over the top of the design.
")
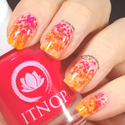
Spring grass and flowers for my base (right hand)
Polishes and Tools
Color Club Meet Me At The Rink
Barry M Spring Green and Pomegranate
Orly Vintage
Chanel Sweet Lilac
American Apparel Neon Violet
What’s Up Nails Droplet Vinyls
OPI Indigo Motif
Color Club Over The Moon
Pure Color Nail art brush #9
Pure Color Watermarble tool
Dotting tool
Rainbow Connection Zap clear
Paper towel, plastic cup, cotton bud
I started with three coats of Meet Me At The Rink, which for a pastel blue is very easy to work with. Often they are streaky and difficult, but I like this polish.
I flicked the green polishes up from my free edge with a nail art brush, to make nice tapered grass shapes which weren’t too even or uniform. Mixing up the two greens added some nice depth to the greenery.
Finally, a few dots with the purple and pink polishes to give the impression of flowers. I didn’t go to too much trouble making them detailed since they were about to be covered up!
")
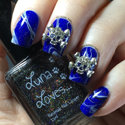
Spring grass and flowers for my base (left hand)
Sadly, as you can see from this photo, some of my dotted flowers streaked with topcoat.
I gave my topcoat about 20 minutes to dry and set my design. That helps not pull up your base with the vinyls when you remove it later.
These vinyls are amazing, I am in love with them. They are the easiest to use I think I have ever found. When peeling off the vinyls from the backing paper, none of the cutouts came with it. That’s so unusual, I normally have to stick the design on to the reverse of the backing paper to weed out the cutouts.
")
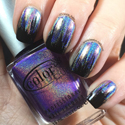
April Showers Watermarble (left hand)
When I applied the vinyls I trimmed the end closer to my free edge to give myself less obstacles when marbling. I also put a couple of cuts in the sides to help them lie flat.

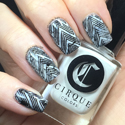
Detail of my April Showers Watermarble
I added latex around my nail, the vinyls and on the pads of my fingers to make clean up a bit easier.
I made a tight zig-zag design starting and finishing with the OPI polish. Both polishes spread and marble easily so this was fairly easy. Once I had dipped and removed the excess polish with a cotton bud, I quickly pulled off the vinyl with tweezers to keep the design as crisp as possible.
")
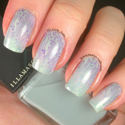
April Showers Watermarble (right hand)
Once I had done a bit more cleaning up, I applied another layer of topcoat and I was done! April Showers Watermarble conquered.