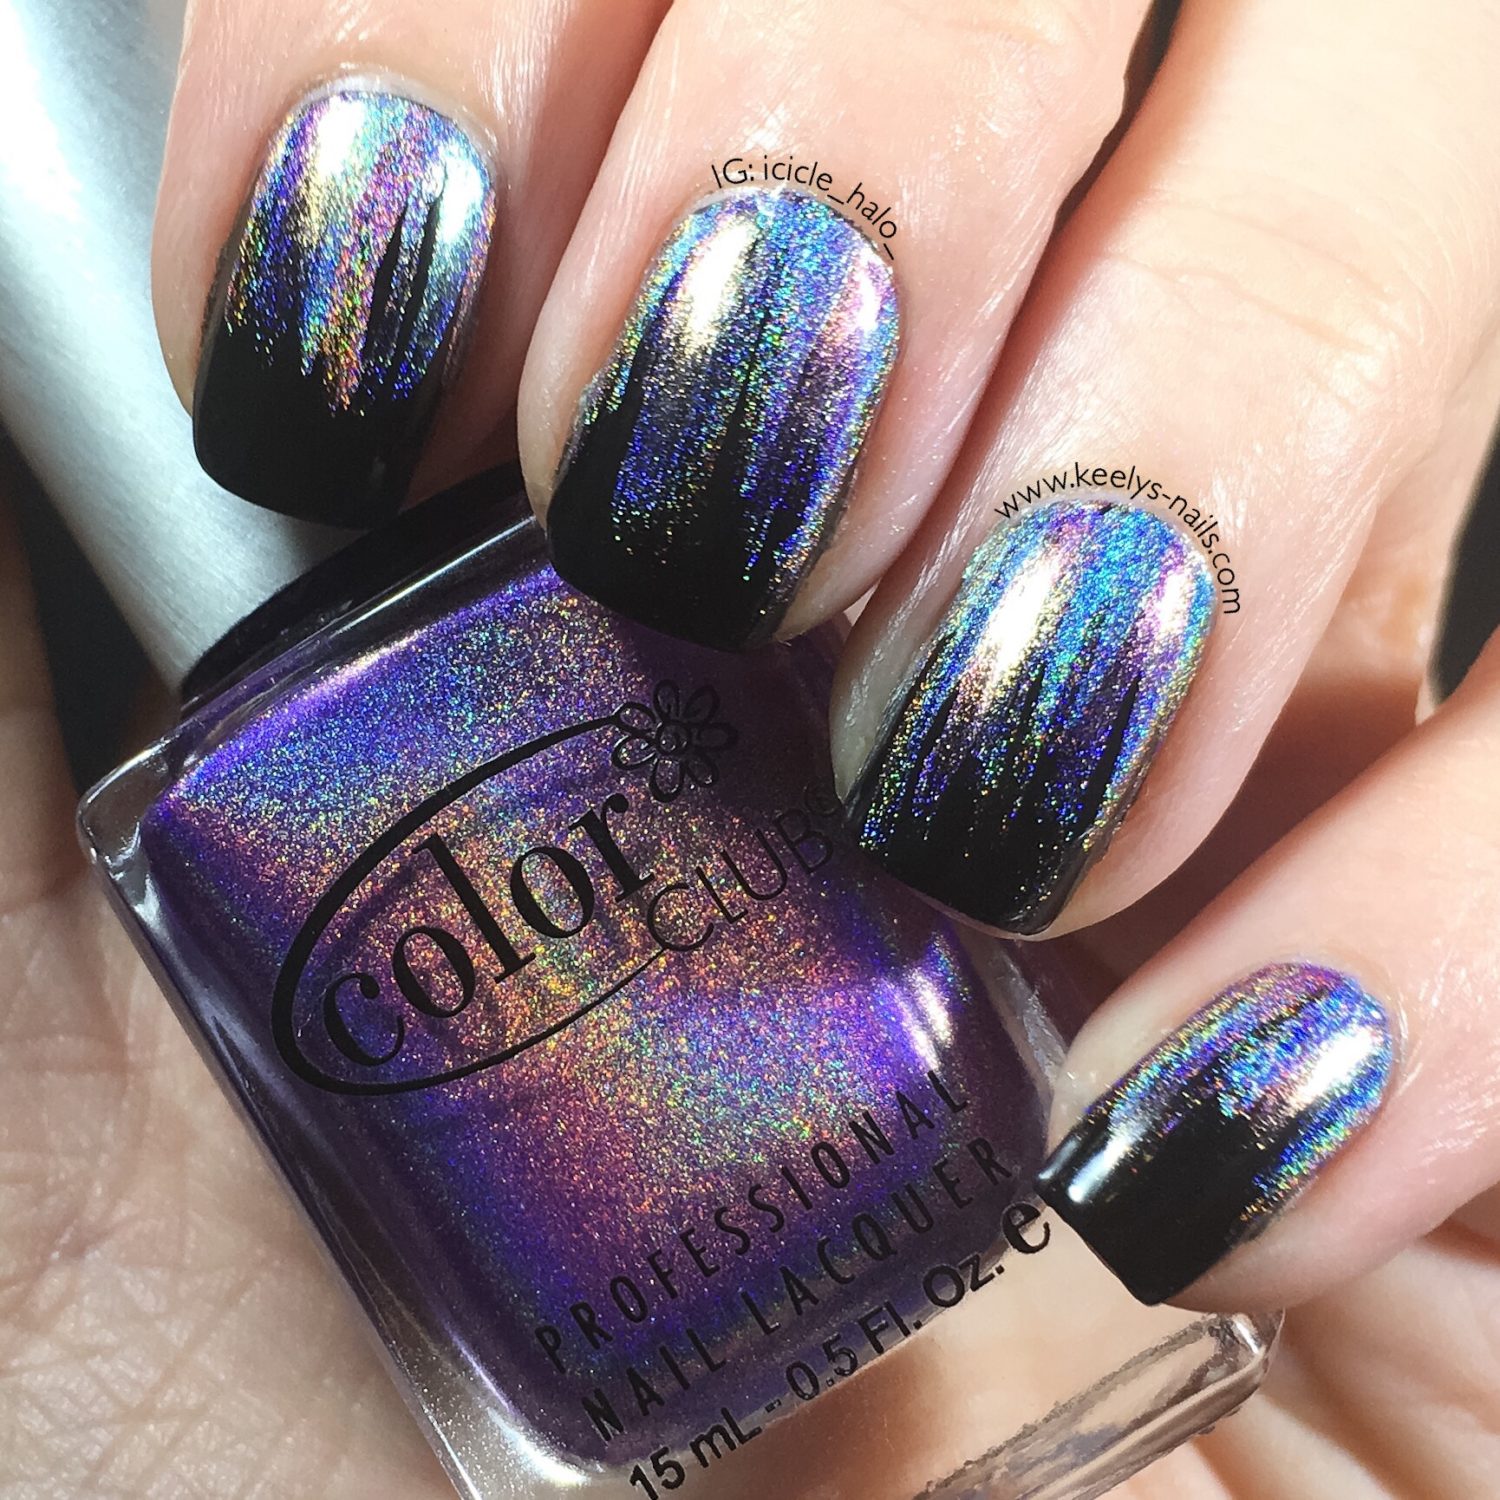
This week’s prompt on Nail Art Nation was waterfall nails. Fabiana did a great design on a beige base which you can find here. I always like to be a bit different, so I decided to start with a black base and create some Holographic Waterfall Nail Art.
I think this would look great in summer sunshine, with all the holo particles throwing rainbows everywhere. However, the UK seems to have skipped August and September, because the weather is rainy October-style right now.
So I’ll just have to imagine it!

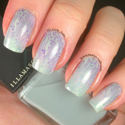
Holographic Waterfall Nail Art left hand
Polishes and tools
Your favourite base coat and top coat
AEngland Camelot
Color Club Eternal Beauty, Crystal Baller, Angel Kiss, Cloud Nine, Miss Bliss, and Over The Moon
Winstonia fine line brush
Rainbow Connection Zap
After my base coat, I started with two coats of Camelot and one coat of top coat. Camelot is pretty opaque and you could almost get away with a single coat, but I find when you get the light behind the free edge it shows it isn’t.
I used Zap around my cuticles to help with clean up. I prefer this design when the lines start cleanly at the cuticles, rather than with a little blob of polish. That means I have to start the lines above my nail and I end up getting it on my skin. Zap helps with the clean up afterwards.
I didn’t have any plan or pattern behind the coloured stripes, so they are all mixed up. If you’re doing this, I recommend you don’t put too much polish on the brush so your lines stay thin. Cleaning the brush frequently helps this too in my experience.

Holographic Waterfall Nail Art right hand
Holographic Waterfall Nail Art
I absolutely love how this looks, like a weird glitching display screen. The holo particles fade out into the black really well too.
Please tell me what you think? Is this a look you’d like to try? Or do you prefer different colours?

August 3, 2016
I love this, there ae so many gorgeous polishes and items for nails these days
August 4, 2016
Thank you! Holographic polishes are some of the best
August 3, 2016
I love how they look! Probably a bit excessive for my job, everyone here is very traditional but looks nice for holidays! x
August 4, 2016
It works really well in all different colour combinations. Try it with a nude base and a range of pink shades and I bet it would work for you
August 3, 2016
I do love this look but I am unsure I could put it on properly – looks like you did a great job.
August 4, 2016
This is really easy, because you don’t want all the lines the same. It doesn’t matter at all if you mess up a little!
August 4, 2016
Definitely got that futuristic look which I love!
August 4, 2016
Thank you Alina! I love this look
August 4, 2016
This looks lovely, not sure mine would look like this after I attempted it though! 🙂
August 4, 2016
You could totally do this Jayne, it’s supposed to have lines all different lengths, so you can’t go wrong
August 4, 2016
We’d love to try this! It would be perfect for the darker days and Halloween!
August 4, 2016
Thank you! It works so well with all different colour combinations
August 4, 2016
It is definitely a look I would try as I love the distortion of colour that creates holographic art.
August 4, 2016
I absolutely love holo polishes! All the colours are so beautiful
August 4, 2016
I love this look. I will definitely be trying it. Thanks for sharing.
August 4, 2016
Thanks, and I hope you have fun creating it on yourself!
August 4, 2016
I love how well these two shades work together and I love the effect it gives x
August 4, 2016
Thank you Rachel!
August 5, 2016
Oh wow, these look so pretty. Love them! You do a great job, not sure I could achieve these amazing nails 🙂
August 6, 2016
Thank you Claire! It’s honestly really easy to do, you should give it a go 🙂
August 5, 2016
Love these, the colours are amazing. These would look great on a night out x
August 6, 2016
Thank you! Definitely perfect for a summer night out, so you get the effect in the sun too 😉
August 5, 2016
Now this I love – just pips the rainbow for our holiday!
August 6, 2016
Ha ha! Black might not be a go to colour for a summer holiday, but I think it really works 🙂