
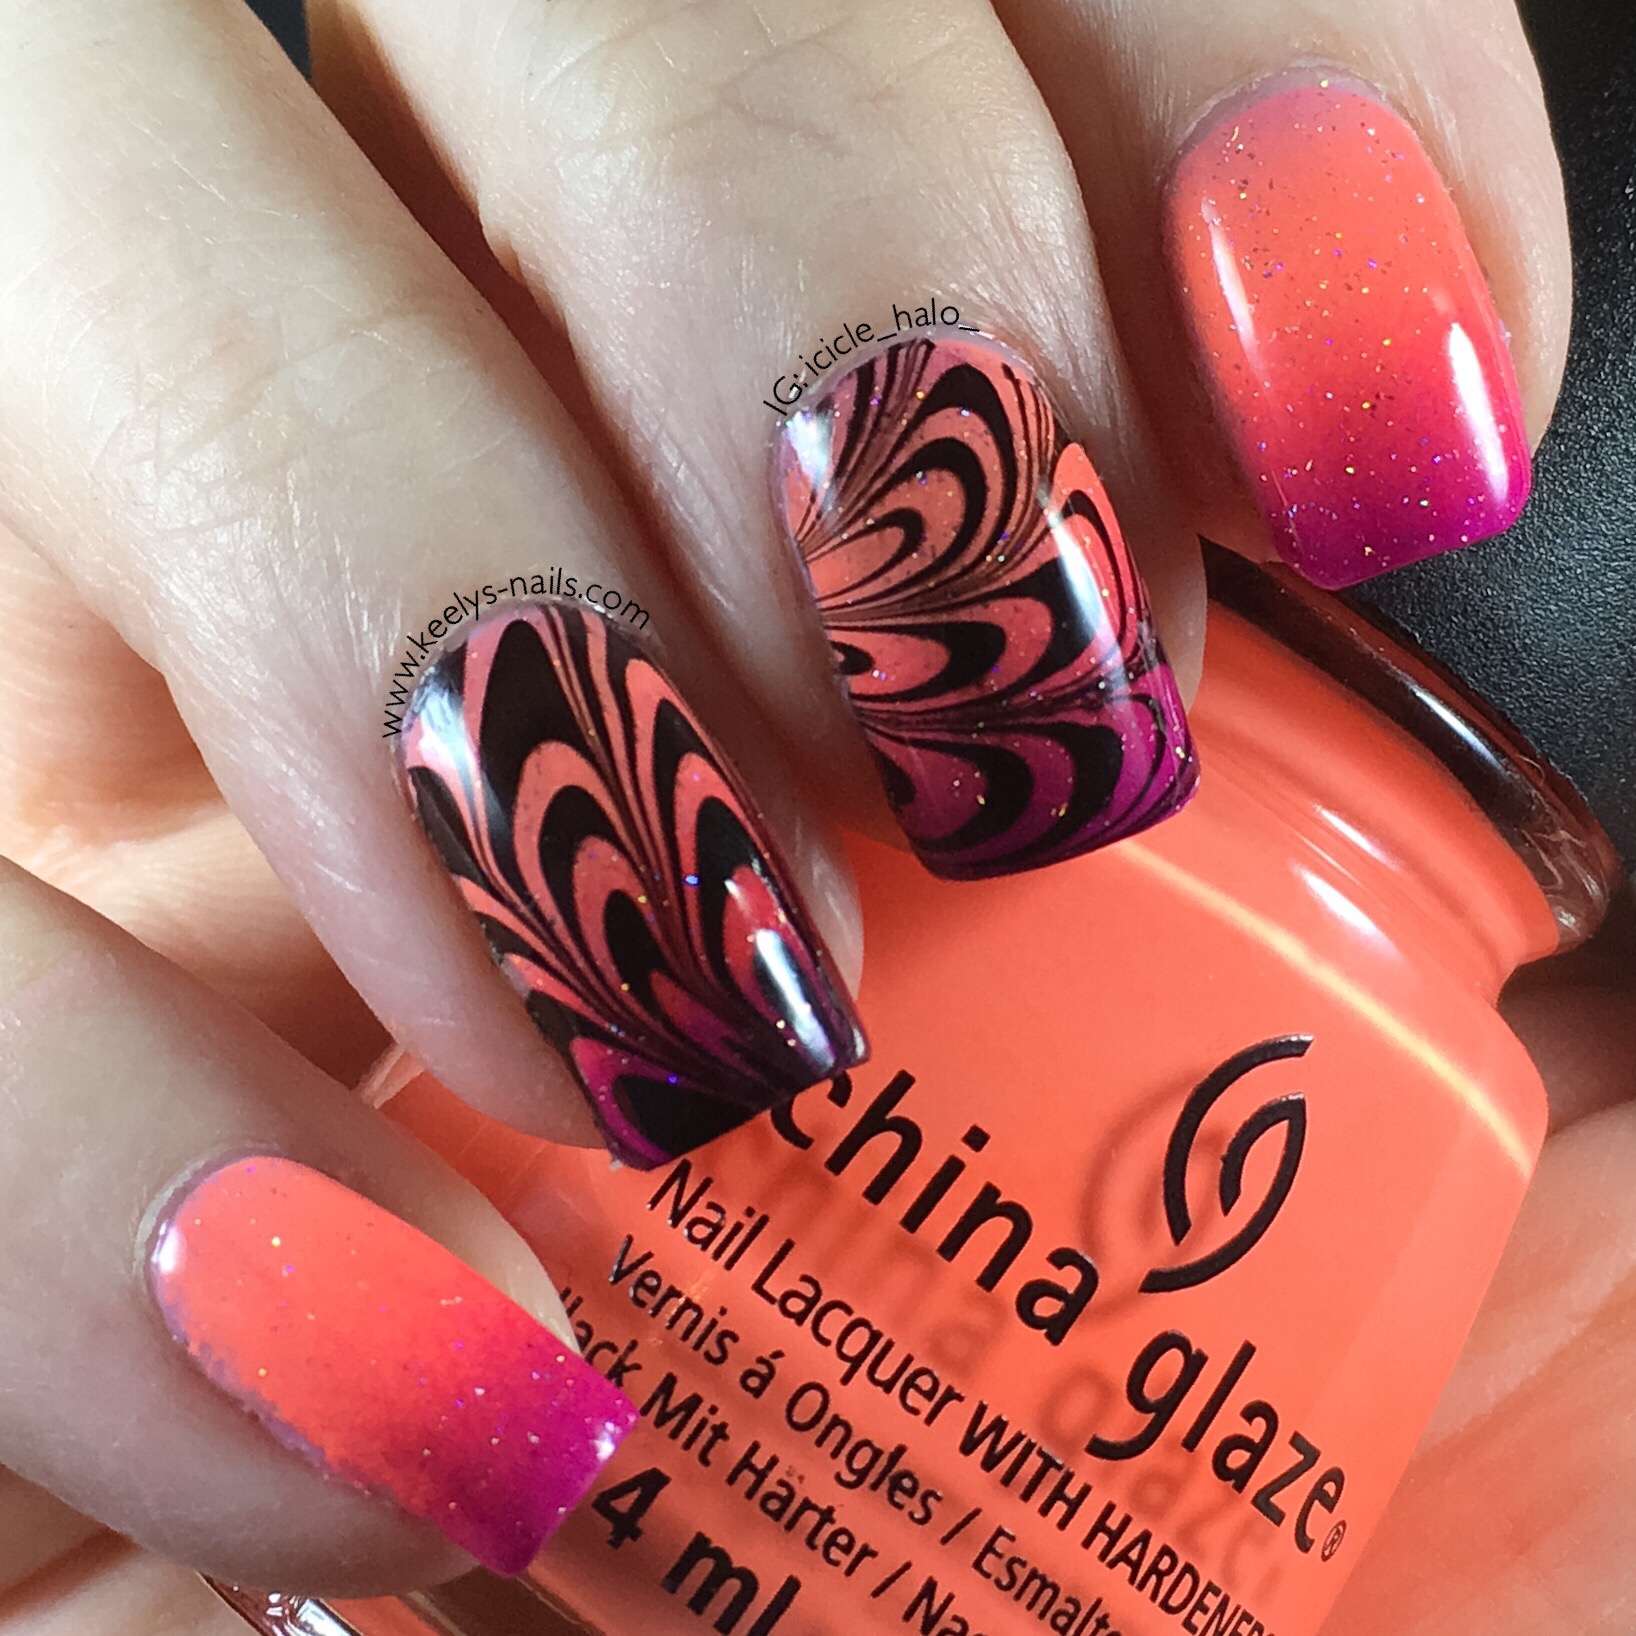
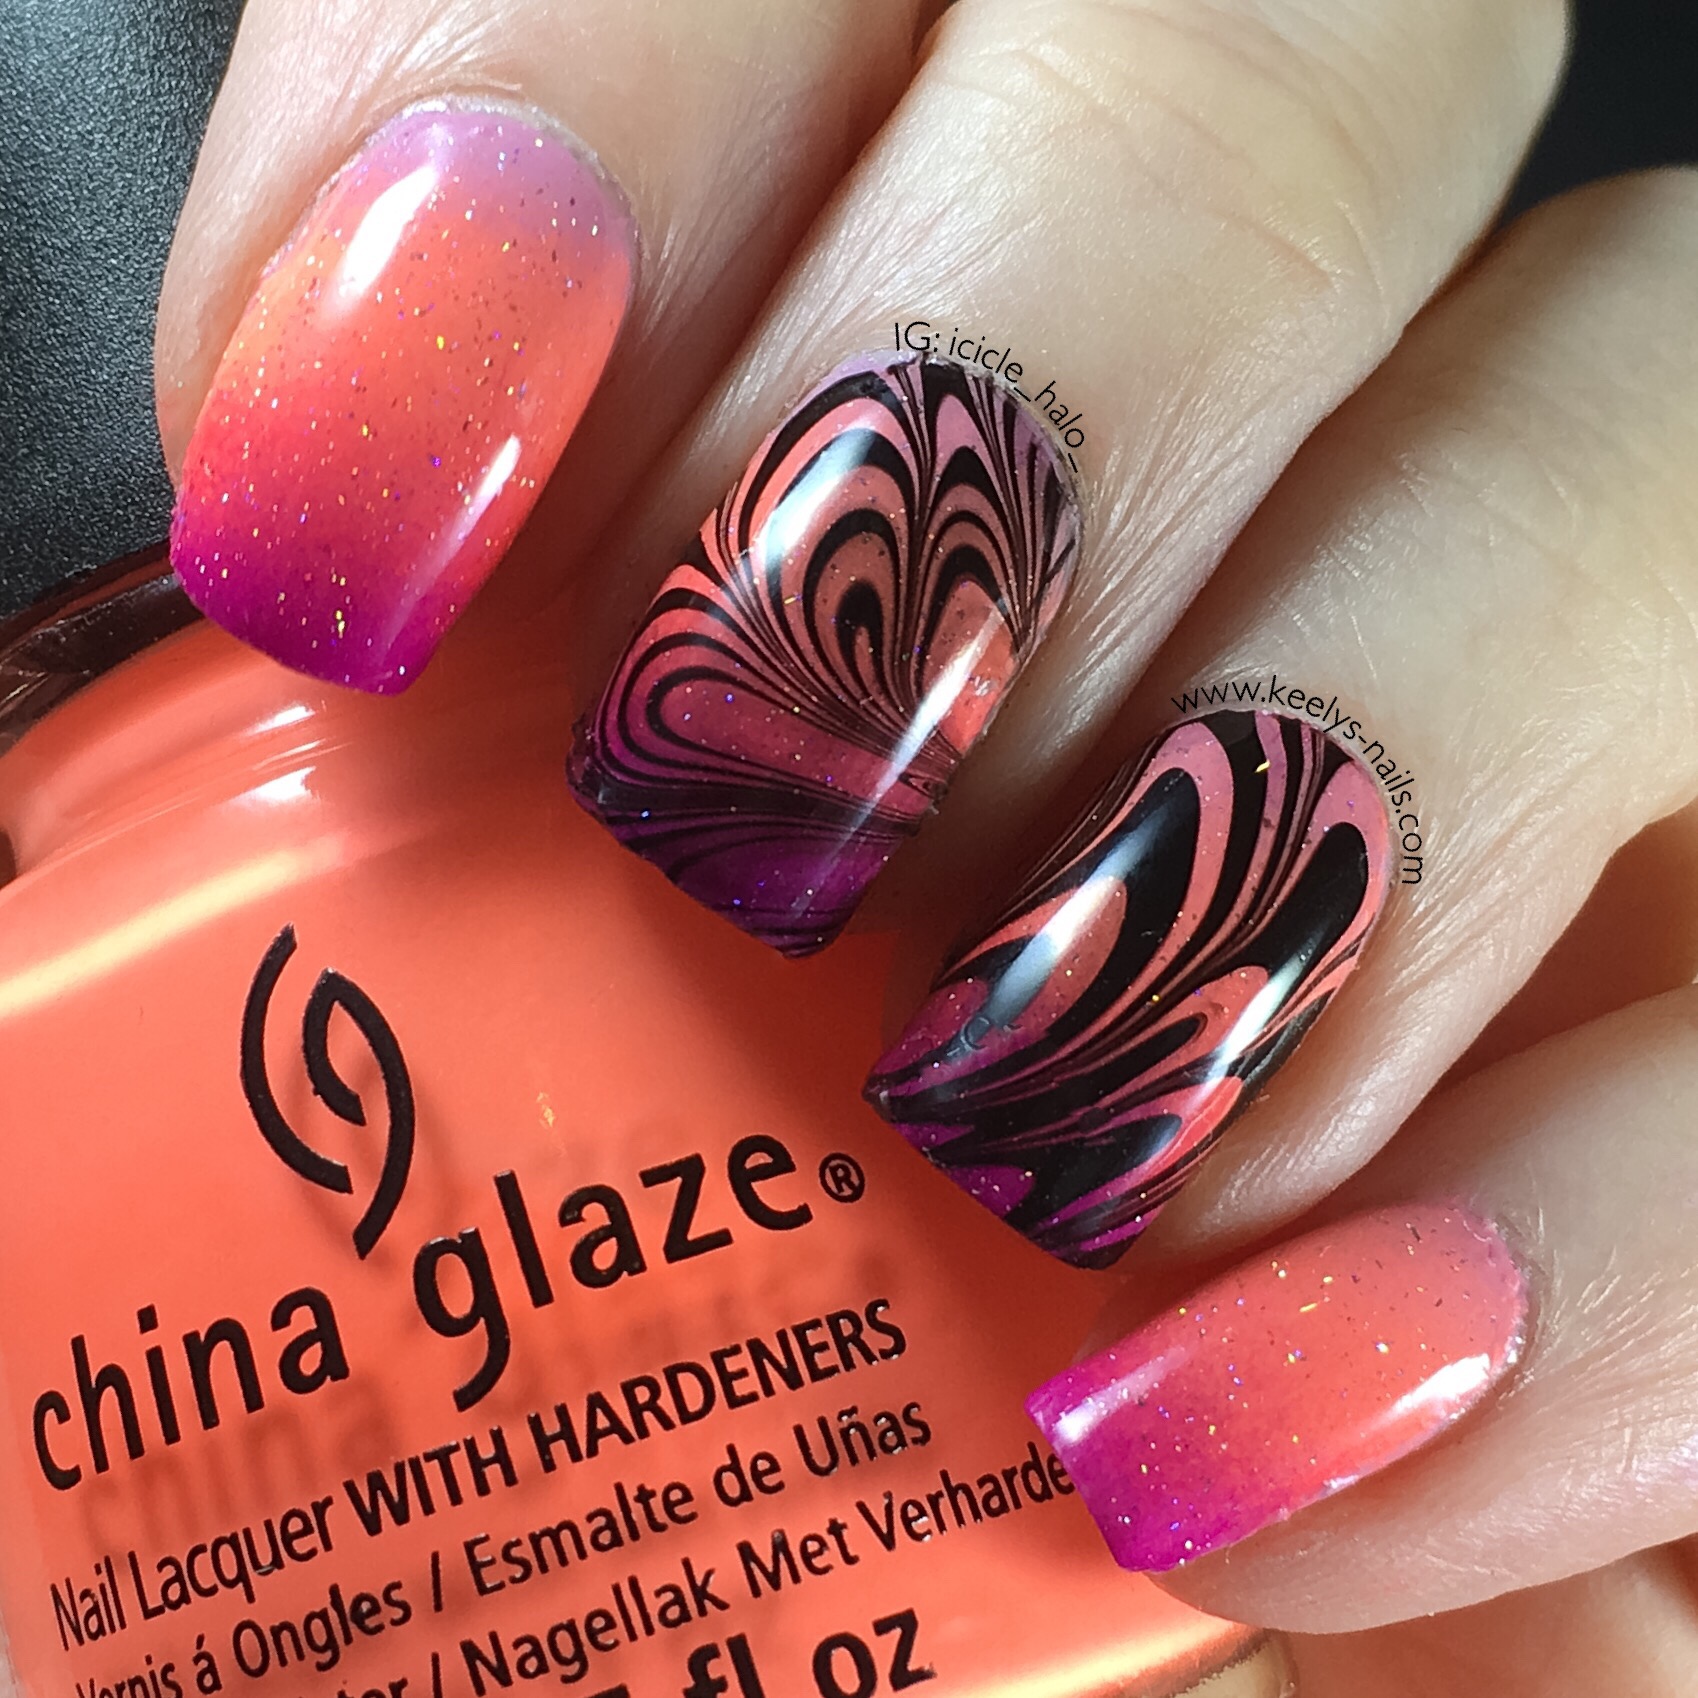
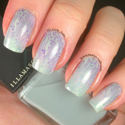
Last month I took on the challenge of a Gradient Watermarble. This challenge was a gradient base, which also means a negative space design.
On Wednesdays I don’t often have very much time, so I quite often only marble two nails. You wouldn’t know it, but I dipped the two fingers together. I have no idea how the design came out at right angles to each other!
Polishes and tools
Gradient:
Chanel Sweet Lilac
China Glaze Flip Flop Fantasy and Pool Party
American Apparel Neon Violet
ILNP My Private Rainbow X
Watermarble:
AEngland Camelot
Rimmel Pro Matte top coat
Tools:
Makeup sponge
Pure Color Watermarble tool #7
Plastic cup
Paper towels
Gradient
I started with a single base coat of Sweet Lilac which was the lightest colour of the three. I think I painted the stripes a little too wide on the makeup sponge, because you don’t see a lot of the lilac on my nails. I guess I am used to having slightly longer nails!
It took about three coats of sponging to get the blend and opacity right. The single coat of ILNP helped to blend the colours even more.
Watermarble
A watermarble with just two colours that I know spread is much easier for me now I have had lots of practice. The matte polish adds a negative space to show the gradient and glitter underneath.
I used the tool to make a feather design in the bullseye, which means pulling towards the centre in lots of close strokes. I wipe the end of the tool every one or two strokes to clean the accumulated polish from the tip. This keeps the design clean and sharp.
Gradient Watermarble

It’s a random, swirling feather-like design, which looks quite trippy with the neon. I love the glittery holographic particles over it too. It looks perfect for summer don’t you think?

May 25, 2016
Awesome nails!!
xo
https://alliesfashionalley.com/2016/05/mrs-meyers-plant-something-day-and-giveaway/
May 25, 2016
Thanks so much Allie ☺️
May 25, 2016
Love the colours the marble effect looks fab
May 25, 2016
Thank you Joanna, it’s really summery I think ☺️
May 25, 2016
I love these they look fantastic, such great colours too x
May 25, 2016
Thank you Cathy, they’ve definitely got the summer vibe going ☺️
May 25, 2016
I’m loving this overall look. Never seen this combination of color and styled used together before.
May 25, 2016
Thank you Chloe! I think the black makes the pink gradient look a bit edgier ☺️
May 25, 2016
Oh wow. This is so beautiful. I love it.
May 26, 2016
I absolutely love the shades you have used in this, I want to pin everything to Pinterest x
May 26, 2016
Haha! Please go ahead Rachel – a lot is already there to be repinned
May 26, 2016
What beautiful nails -so glad we stumbled across this blog – my mummy is about to invest in a nail art and gel set. Lovely post!
May 26, 2016
That is such a fun manicure. It’s perfect for the summer!
– Elise
http://www.prettyandfun.com
May 26, 2016
Lovely nails. I want to try this water marbling technique on some ceramics to see who it works.
May 26, 2016
I’ve certainly seen plenty of videos showing how it’s done on mugs. I don’t think they are dishwasher proof though!
May 27, 2016
OMG you are a genius with nails. Simply stunning, I’m so jealous (in the nicest way) xxx
May 27, 2016
Thank you Andrea!
May 27, 2016
Wow, these are incredible!! I have never been good at doing my own nails, I have to get someone else to do it for me. I can only seem to do the one hand, the other hand is too shaky! xxx
May 27, 2016
It’s just down to practice Yvonne! I used to be the same but the practice has made all the difference
May 27, 2016
That is stunning – I so want that done on my nails
May 27, 2016
I love these – a really awesome look, and the colours make me think of summer 🙂
May 27, 2016
Gorgeous nails x great post x
http://mariesbeauties.co.uk
May 27, 2016
These are incredible, love the watermarble x
May 29, 2016
Thanks Jenni – I was so frustrated for so long about my inability to achieve this technique, but I am glad I stuck with it now 😉
May 27, 2016
I looks great! I am trying to make more effort and do my nails more often!
http://lilinhaangel.com/
May 29, 2016
Do it! Start simple with just a basic shaping and a colour you love – it makes you proud to see your hands and they are in your eyeline more than you realise 🙂
May 28, 2016
Gorgeous nails I love the gradient/ombre finish and the colours that you chose are perfect x
May 29, 2016
Thanks Ana, I love these colours too – just the right shades of neon brights 😉
May 29, 2016
This is an artform! It’s really impressive how you manage to have such a pro finish.
May 29, 2016
Thank you Grant! It’s down to years of practice and better photography helps too 🙂
May 30, 2016
I love this, your gradient colours are beautiful!!
Jess xo
http://www.theindigohours.co.uk
June 9, 2016
Such beautiful nails, i love them!
http://www.laurajanestyle.blogspot.co.uk
June 9, 2016
Thanks Laura!