Valentine’s Day Designs
Two Nail Art Ideas for Valentine's Day Designs
I know this is very late, but I’m trying to catch up a bit on my blogging with my Valentine’s Day Designs for nail art. This year I created two designs and I even made my own tutorial!
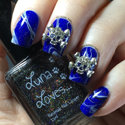
Valentine’s Day Designs: Floating Hearts
The first design is pretty easy – just some glitter placement and acrylic paint, and the full tutorial is above.

Valentine’s Day Designs: Floating Hearts
Polishes and Tools
Barry M Butterscotch Sundae
Nails Inc Alexa Hearts
Pure Color Watermarble Tool
Acrylic paint
Nail art brush (I trimmed this one to make it super-skinny)
I think next time I will take a bit more effort in trying to reduce how much base comes with the glitter pieces – the finished product looks a bit lumpy, even though it wasn’t. And I really need to clean up better – these close-up, sharply in focus photos are so unforgiving!
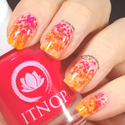
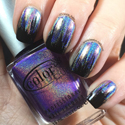
Valentine’s Day Designs: Watermarble Hearts
This design was part of the Watermarble Wednesday challenge on Instagram. I tried (and failed) to create a proper watermarble heart shape, so instead used heart vinyls from What’s Up Nails as a stencil and watermarbled through it.

Valentine’s Day Designs: Watermarble Hearts
This one is a bit more complex so I will walk you through it.
- I painted my nails with two coats of Barry M Cream Soda and one coat of Seche Vite top coat, then let it set for about 20 minutes.
- I applied liquid latex around my nail and up to my knuckle, also on the pad of my finger and under the free edge.
- Once the latex was dry, I applied the vinyls to two fingers and made sure they were smooth and stuck down over my whole nail.
- I watermarbled some loops and swirls using OPI Magenta Muse and Indigo Motif. It was quite a tight design, because the heart shapes are small.
- Once I dipped and cleared the excess polish from the water, I removed the vinyls as quickly as possible.
- After it had dried a bit I added another layer of top coat.
You can see where the colours bled under the vinyls slightly and where there are gaps. I think if the vinyl isn’t properly stuck down it creates a bubble of colour that is removed with the vinyl. But very striking and effective overall.
I hope you enjoyed seeing my (very late) Valentine’s Day Designs!