Watermarble Practice Wednesday
Recently the prompt for #wmpw2016 was a matte feather design. I couldn’t resist using all my OPI Color Paints in one go and went for a Rainbow Feather Watermarble.

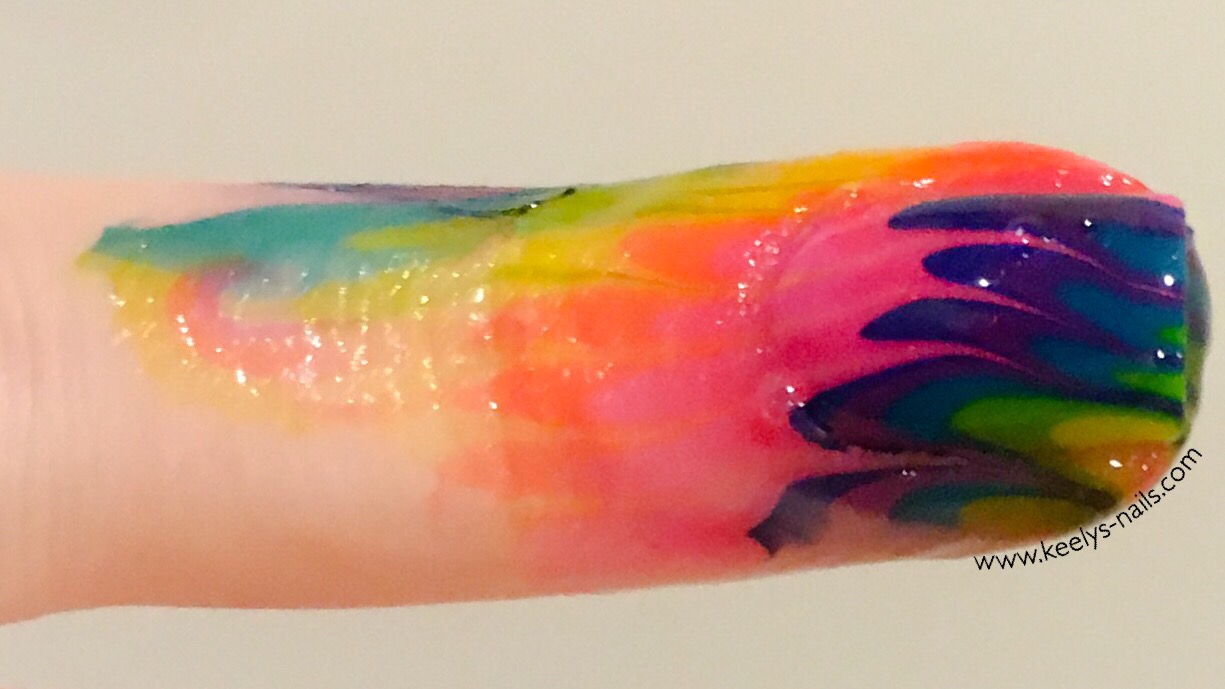
Before clean up, but so pretty!
I had issues with my matte topcoat. It just wouldn’t dry matte on all my fingers!

Left hand Rainbow Feather Watermarble. Is it matte or shiny nail art? Who knows what is wrong here…
You can see my ring finger is matte and my middle finger is only semi-matte. I have no idea what’s happening here!

Right hand Rainbow Feather Watermarble
Not really matte at all…I think I prefer it shiny anyway!
Polishes and Tools
Colors by Llarowe Chasing a Unicorn duo
OPI Color Paints full set
Pure Color watermarble tool
Rimmel Pro Matte topcoat
Rainbow Connection Zap clear
Plastic cup filled with room temperature water
Cotton bud
Paper towel
How To Create Rainbow Feather Watermarble
For the base, I used two coats of the CbL colour correcting base and two of the white holographic polish.
I was hoping that the holo would show through the marble…it didn’t. I love it anyway!
Next I painted up to my knuckles on both sides of my fingers with Zap. If you get a bit on your nail, wait until it has dried and then push it back gently with an orange stick. This is easier when you use a coloured latex barrier though!!
I created a bullseye with all eight colours, one drop in turn, twice over. Try not to stick your latexed fingers together at this point!
To make a feather design, draw your tool or pin across the rings of polish from near the edge, across and past the centre. Repeat on each side, quite close together until you have a design you like. I need to wipe my tool off regularly, so I keep some paper towel close at hand. Work quickly!
Find a spot on the design you like and dip your nail in. Aim for a 45° angle, and hold your nail or nails under while you clean out the excess polish. I use a cotton bud for that. Keeping your nails at the same angle, gently pull them out the water.

Look at all the colours!
Pull off the latex and clean up any excess polish. If you have any little bubbles, they may have water in them, so don’t topcoat yet. After about 5 minutes when the polish is nearly touch dry, use a moistened clean fingertip to gently press them flat. The water will be freed without messing the design up too much.
Finish with topcoat and you’re done.
Rainbow Feather Watermarble
I just can’t get enough of rainbows right now, and this design provides a double dose. I didn’t want to take it off for ages!
It’s a bit more advanced than some of the designs I do, but so worth it.
I can certainly recommend getting involved in Watermarble Practice Wednesdays. It’s really made a huge difference to me. I used to curse this technique and avoid it at all costs while being wildly jealous of anyone who could. Look at me now!